Deconstructing the Bull Run Battle Map: A Tactical and Strategic Evaluation
Associated Articles: Deconstructing the Bull Run Battle Map: A Tactical and Strategic Evaluation
Introduction
With enthusiasm, let’s navigate by the intriguing subject associated to Deconstructing the Bull Run Battle Map: A Tactical and Strategic Evaluation. Let’s weave attention-grabbing data and supply contemporary views to the readers.
Desk of Content material
Deconstructing the Bull Run Battle Map: A Tactical and Strategic Evaluation
The First and Second Battles of Bull Run (or Manassas), fought in July 1861 and August 1862 respectively, symbolize pivotal moments within the American Civil Battle. Understanding these battles requires greater than only a recitation of troop actions; a deep dive into the battle maps themselves reveals essential tactical selections, strategic miscalculations, and the inherent limitations of the terrain. This text will analyze the battle maps of each Bull Run campaigns, exploring the important thing geographical options that formed the combating and highlighting the influence on each Union and Accomplice methods.
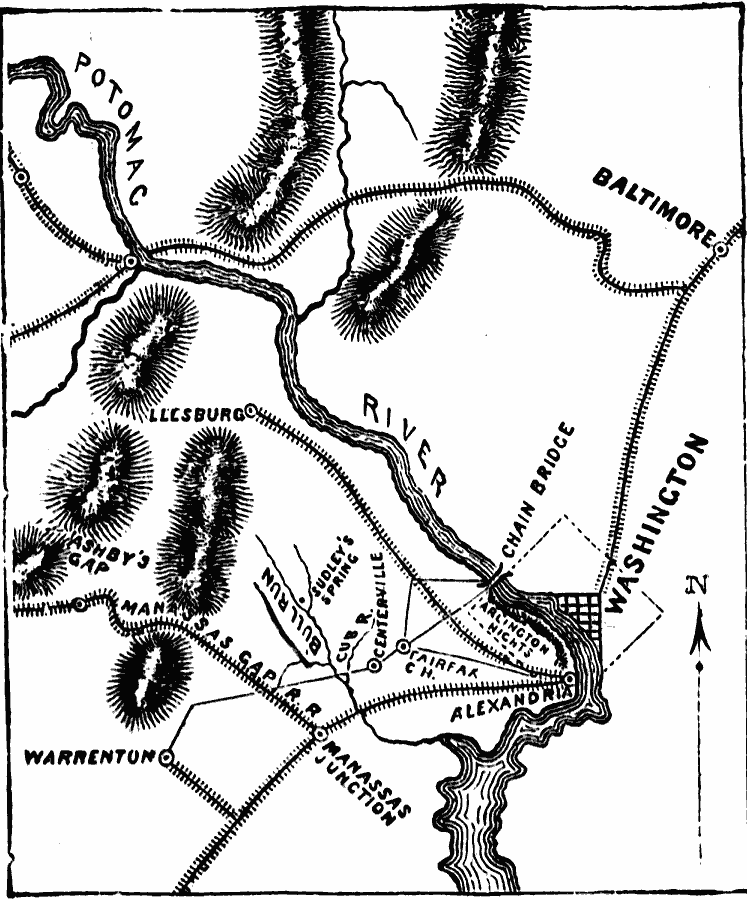
The First Battle of Bull Run: A Union Catastrophe Revealed on the Map
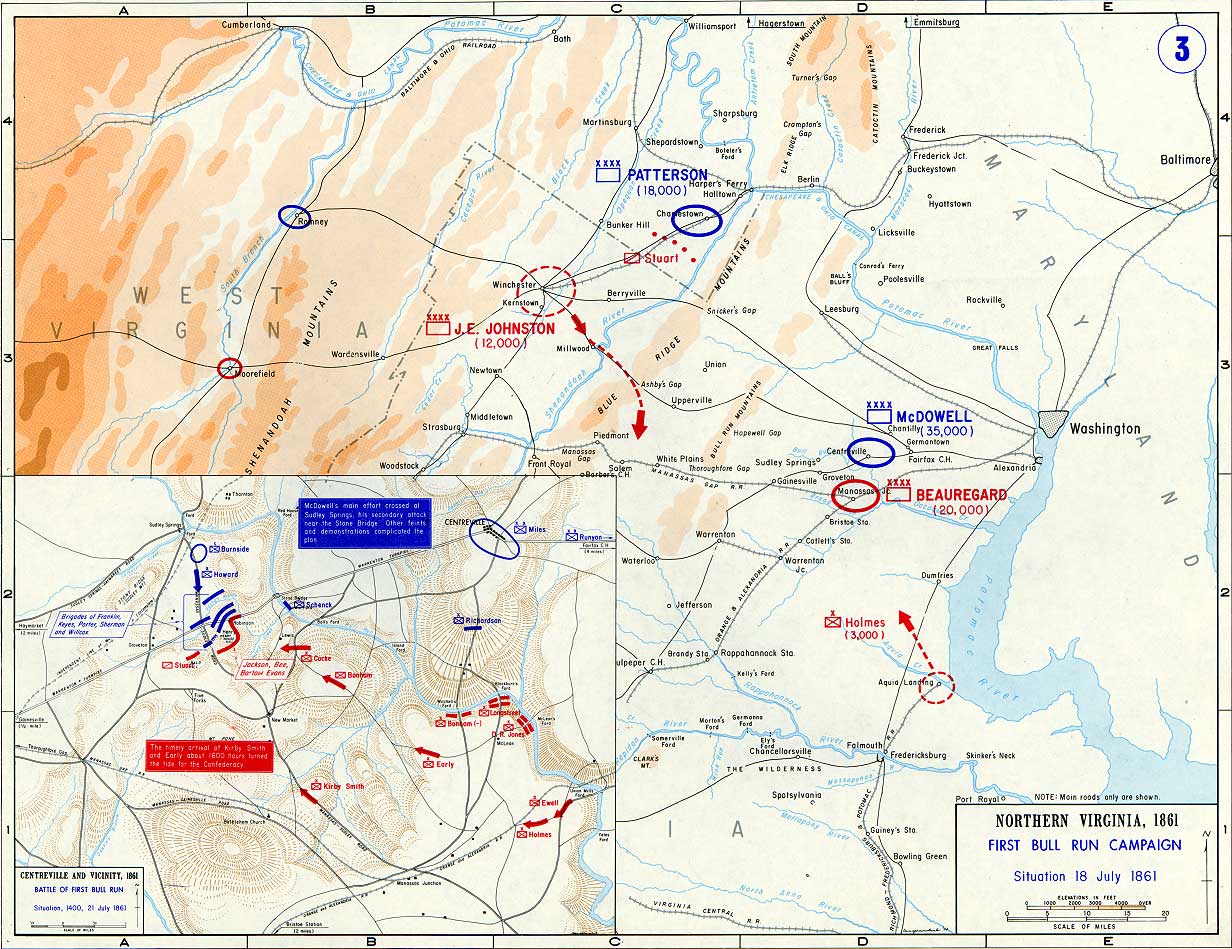
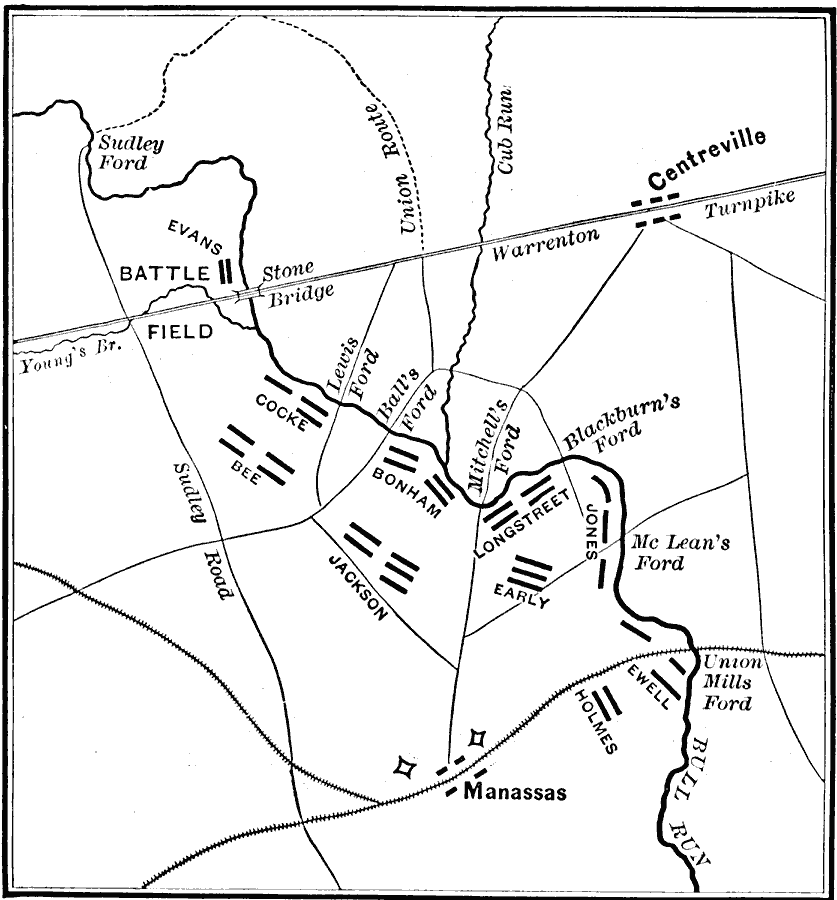
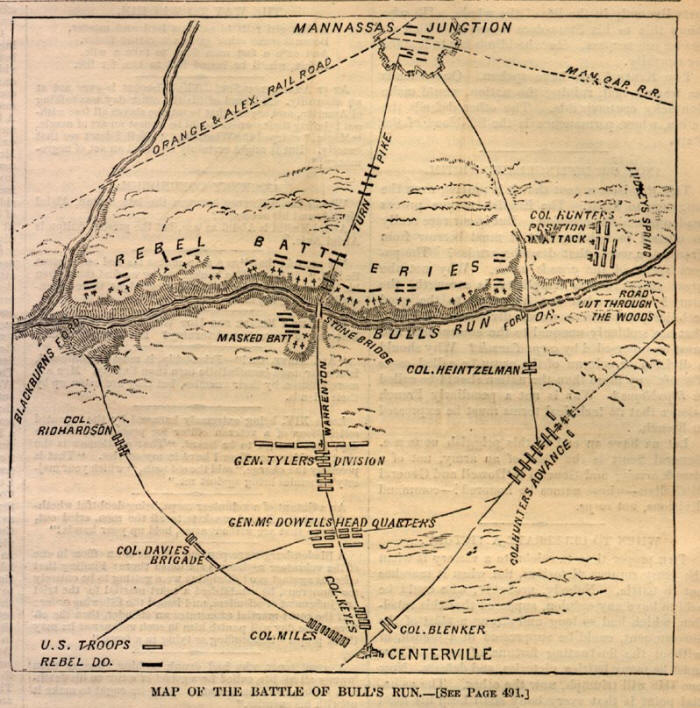
The map of the First Battle of Bull Run instantly highlights the geographical challenges dealing with the Union Military. The battlefield, centered across the small city of Manassas Junction, Virginia, is characterised by a rolling panorama punctuated by streams, woods, and comparatively open fields. The essential ingredient is the Bull Run itself, a comparatively shallow however vital impediment that dictated troop actions and created chokepoints.
Inspecting modern maps reveals the Union Military’s preliminary deployment. They superior alongside a converging route, aiming to encircle the Accomplice forces. Nonetheless, the map exhibits a vital flaw of their plan: the dearth of a unified, coordinated advance. As a substitute of a concentrated push, the Union military deployed in a number of columns, resulting in a fragmented and disorganized assault. The Stone Bridge, positioned close to the confluence of a number of roads, grew to become a key bottleneck, delaying the Union advance and permitting the Confederates to bolster their strains.
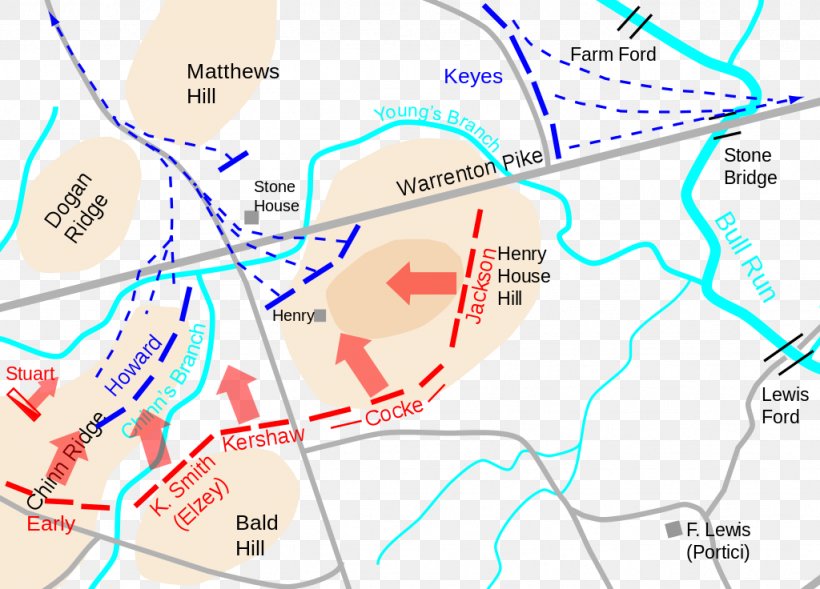
The map additionally underscores the Accomplice benefit in using the terrain. Their place alongside the Henry Home Hill, a strategically necessary excessive floor overlooking the battlefield, supplied wonderful statement and defensive positions. The map illustrates how the Confederates successfully used the woods and fields to hide their actions and launch devastating flanking maneuvers, significantly throughout the pivotal counterattack that shattered the Union line. The Union military’s advance, as depicted on the map, was largely linear and predictable, simply countered by the Confederates’ extra versatile deployment.
Analyzing the map, one can see the Union’s failure to adequately scout the Accomplice positions. The shortage of correct intelligence is clear of their incapability to anticipate the Accomplice counterattack. The map reveals the chaotic retreat of the Union military, highlighting the breakdown in command and management as they had been compelled again in direction of Washington, D.C. The scattered nature of the Union retreat, as displayed on the map, displays the panic and disarray that characterised the Union defeat.
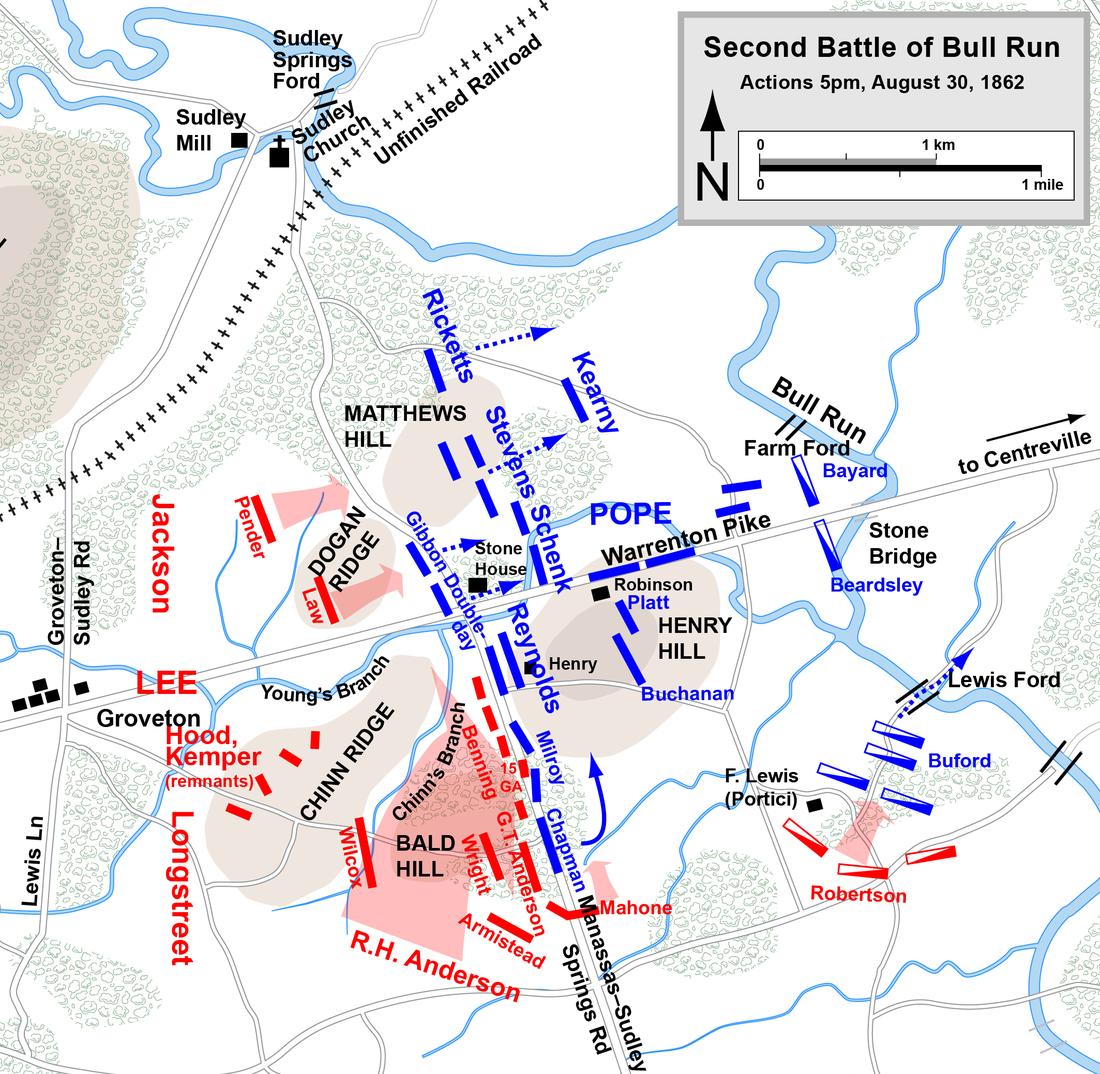
The Second Battle of Bull Run: A Extra Complicated Map, a Extra Complicated Battle
The Second Battle of Bull Run, fought a yr later, presents a extra advanced battlefield on the map. Whereas the overall space stays the identical, the Accomplice military, underneath Robert E. Lee, had realized from their earlier victory and adopted a extra refined technique.
The map of the Second Battle of Bull Run exhibits a extra fluid and dynamic engagement. The Confederates, using their superior information of the terrain, employed a collection of flanking maneuvers, shifting their positions to take advantage of weaknesses within the Union strains. Lee’s use of Stonewall Jackson’s corps, as depicted on the map, was a masterclass in tactical deception and swift maneuverability. Jackson’s flanking assault, hid initially by the terrain after which unleashed with devastating impact, is clearly seen within the development of the battle proven on the map.
The map additionally reveals the constraints of the Union’s try at a coordinated assault. Whereas they’d realized from their earlier defeat, their efforts had been hampered by poor communication and a scarcity of decisive management. The map exhibits the fragmented nature of the Union advance, with varied corps working independently and failing to attain a cohesive assault. The Accomplice skill to shift their forces quickly, as demonstrated on the map, successfully countered the Union’s makes an attempt to achieve a bonus.
The Second Battle of Bull Run map additionally highlights the significance of railroads within the conflict effort. Manassas Junction served as a vital rail hub, and management of the junction was very important for either side. The map reveals the strategic significance of the railroad strains in supplying and reinforcing troops, and the battles for management of those strains had been integral to the general final result.
Moreover, the map illustrates the elevated scale and depth of the combating in comparison with the primary battle. The bigger variety of troops concerned, as evidenced by the map’s scale and the density of troop markers, led to a extra widespread and extended engagement throughout a bigger space of the battlefield.
Evaluating the Maps: Classes Realized and Unlearned
Evaluating the maps of the 2 battles reveals vital variations in each the tactical execution and strategic planning. The Union military, regardless of struggling a devastating defeat within the First Battle of Bull Run, failed to completely be taught from its errors. Whereas some enhancements had been made in group and coaching, the Second Battle nonetheless demonstrated a scarcity of cohesive command and management, and a failure to successfully make the most of intelligence and exploit alternatives introduced by the terrain.
The Accomplice military, alternatively, demonstrated a marked enchancment in its skill to leverage the terrain, coordinate troop actions, and execute efficient flanking maneuvers. Their success within the Second Battle of Bull Run was largely as a consequence of their superior understanding of the battlefield and their skill to adapt their technique to take advantage of the Union military’s weaknesses.
Conclusion: The Maps as Historic Paperwork
The battle maps of Bull Run will not be merely visible representations of troop actions; they’re essential historic paperwork that supply invaluable insights into the tactical and strategic selections made throughout these pivotal battles. By fastidiously analyzing these maps, we are able to achieve a deeper understanding of the strengths and weaknesses of each the Union and Accomplice armies, the influence of terrain on battlefield dynamics, and the enduring classes of those early engagements of the American Civil Battle. The maps function a strong reminder that understanding the geography of a battle is simply as necessary as understanding the methods and techniques employed by the opposing forces. They’re home windows into the previous, permitting us to be taught from the errors and successes of those that fought on the fields of Manassas.
![Home [battlesofbullrun1.weebly.com]](https://battlesofbullrun1.weebly.com/uploads/2/5/2/1/25213972/4896497.jpg?626)
Closure
Thus, we hope this text has supplied helpful insights into Deconstructing the Bull Run Battle Map: A Tactical and Strategic Evaluation. We thanks for taking the time to learn this text. See you in our subsequent article!